Your presentation folders aren’t just a container for your documents; they’re a direct representation of your business and the quality of your work. Similar to a warm greeting from a receptionist behind a polished desk, your presentation folders are actually part of an all important first impression and should be carefully considered.
At Conformer, our custom presentation folder printing services allow you to create sophisticated and professional designs for your company that help you stand out.
If you’re just getting started, it might be a little confusing designing and preparing your files for printing. So we’ve put together this guide to help you learn the basics. Follow these seven tips for perfect presentation folder printing every time.
Pre-Design: Presentation Folder Printing Setup
1. Select the right size and features
Conformer folder sizes accommodate legal and letter-size documents. Determine how often your company handles either document size as well as the typical thickness of your documents. Then select the appropriate sizes.
You never have to worry about the quality of your presentation folders and mailers when you use Conformer products. Our presentation folders and mailers are made of durable extra-thick 100# linen and 14pt coated papers.
In terms of features, we offer presentation folders with pockets (single and double options, all reinforced with our patented design), various page capacities, and business card slits.
2. Create custom presentation folders with durable materials and beautiful style
After choosing your folder, select your paperboard and business card slit style. Our sustainable and durable options include premium linen, FSC® mill certified paper, and premium coated paperboard.
Be sure to take the color options for each paperboard into account. Your color will be the foundation of your design.
Select printed ink or foil stamping (metallic or non-metallic) to print your logo, company name, and copy. For a classic aesthetic, law and financial firms typically opt for dark colors with metallic foil stamping. Meanwhile, lighter colors with non-metallics have a more modern look.
Designing Your Custom Presentation Folder
3. Use our template while designing
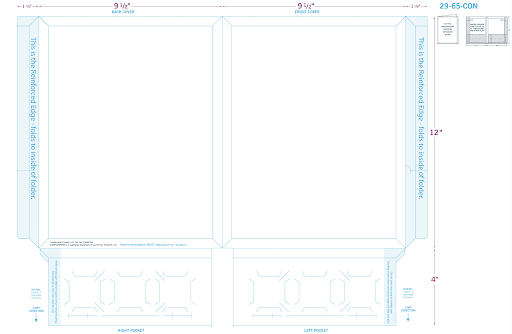
Before creating your design, download the template from your folder’s product page. Import it into your program as a layer and place your images and copy within the printable area.
Dimensions (9.5” x 12” with 4” pockets) are in red. No print zones (areas that will be folded to form folder pockets) are shaded in blue. Each template includes product dimensions and front, back, internal, and external views.
Make sure to review our file prep checklist and artwork guidelines when sending your custom designs for perfect presentation folder printing.
4. Consider adding highly-detailed customization
In the world of branding, first impressions are powerful. We offer embossing, debossing, and foil stamping to make your presentation folder designs memorable.
Foil Stamping
Available in metallic and non-metallic colors. Having your logo and company name foil-stamped adds texture and sophistication to your design.
Embossing
Embossing raises images above the surface of your presentation folder. It’s a subtle way to add unique texture to your design.
Debossing
Debossing produces a design below the surface. Think of a stamp that presses an image into the material.
In a world of mostly digital marketing, physical marketing helps your business stand out. These custom presentation folder printing options can even be combined to produce unique designs.
5. Keep your presentation folder design balanced
Leave adequate space around your copy and logo so that they stand out. Avoid placing anything in the left ⅓ rd of your presentation folder cover. It often won’t be visible while clients are handling the folder.
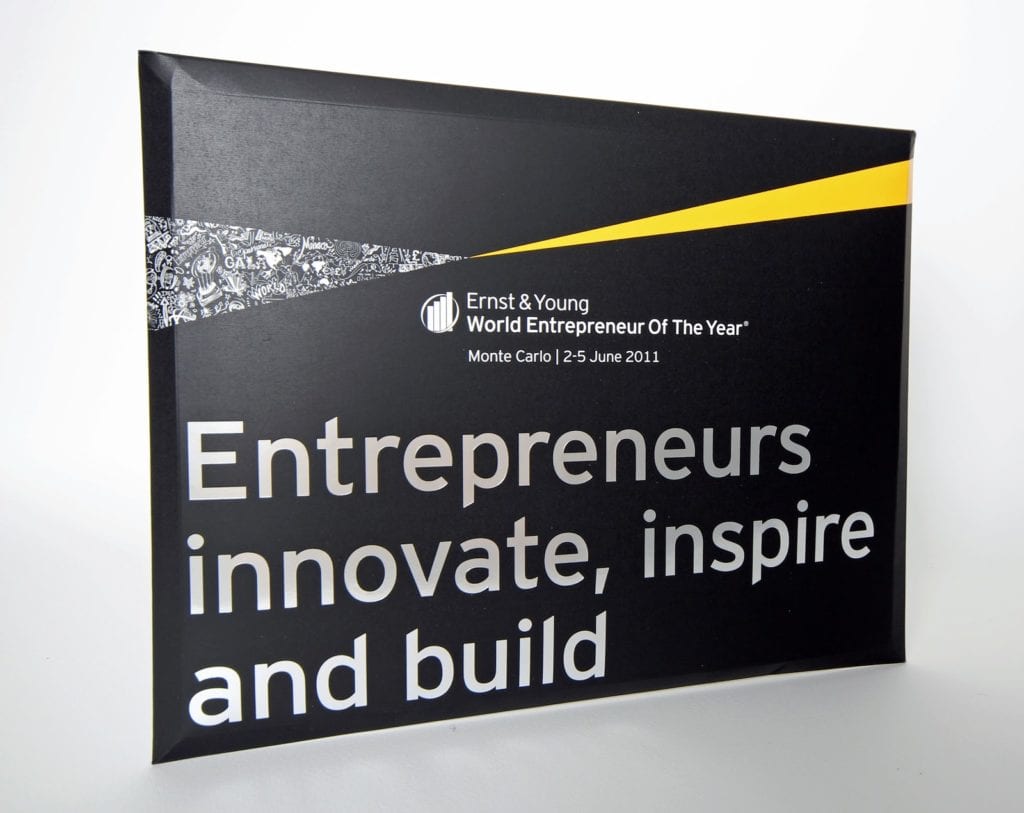
If you’re in the early design stages, Ernst & Young’s Conformer® Benny Award-winning mailer design (pictured below) is an excellent place to start for inspiration.
The copy is effective. The logo and company name are placed in an area where they are visible while the mailer is being handled.
Preparing Your Design Files for Presentation Folder Printing
6. Basic file requirements for printing
Design files must meet the technical requirements below to avoid extra costs and receive proofs quickly:
- Create a separate PDF showing all layers (or color break it)
- Save images in TIFF format
- Include all files in a zip file (excluding the PDF)
- Use a .COMP to ensure that all elements are printing correctly
- Print separations (or plates) to ensure that color break is correct
You can also view our full artwork guidelines here or get in touch with a Conformer pro for assistance.
7. Format your files for foil stamping, embossing, and debossing
Naming your layers according to how they will be printed will help to keep your files organized. See the tutorial below:
For foil stamp artwork, please use 8 pt font size or larger. If your art has intricate fine lines, make spacing 1 pt or more.
For embossing, ensure that any copy is 1/8” away from all sides. Use font 10pt or larger and lines 2 pt or larger artwork.
Save and send these files as EPS files, which are specifically designed for printing.
For full instructions about how to prepare your artwork files for printing, take a look at our File Prep Checklist below.
You now have all the information needed to order your custom-printed Conformer® Presentation Folders.
Conformer is proud to serve prestigious clients in a range of professions. Our presentation folder printing pros are always here to help. Our premium products paired with your custom design will leave a lasting impression on every client.


